

Health & Beauty
The Next Generation of Ionic Plasma Thrusters
After considerable redesign, the BSI Mark II is the most potent ionic thruster of modular design yet. It improves upon my first Ionic thruster in every category imaginable, and, is structurally very solid. The future of flight is, is ionic. This video details the struggles and successes I had as I designed an ionic thruster worthy of the BSI title. Here’s the first version of the thruster :
This is the BSI-2 thruster. Like its predecessor, it relies on tens of thousands of volts to create thrust using no moving parts. Unlike its predecessor, it’s half the size, moves twice as much air, and is much more durable.
You see, back in 2018, MIT built the world’s first ionic thrust airplane. So in response to their work, I recently designed what I called a next-gen ionic thruster. The months of work I put into it led to a decent first prototype, and a measurable amount of thrust.

But, uh, it was actually quite basic. At the end of my video on the thruster, I acknowledged the design had room for improvement. But it does have some inefficiencies.
I’m thinking of three in particular. Well, it had a lot of room for improvement, actually. And after a friend of mine over in Portugal built his own ionic thruster and crowned himself the Velocity King… Five meters per second? Almost six! It was time for me to step up to the plate and create the BSI-2.
Dude! That’s a huge improvement! So the video on the first BSI thruster was really well received. And since I acknowledged in the video that my design had room for improvement, it was basically an open call for you to critique my work. And I received a lot of great feedback, and a lot of feedback that would have made the design terrible.
Overall, I wanted to design a thruster which was modular and capable of eventually propelling a fixed-wing airplane. It was a huge engineering challenge, so I took my time and worked on other projects in the meantime, like my plasma-filled river table. But then my friend Joel reached out, curious about the thruster.
He wanted to build his own, so we chatted for a bit about operational theory. And with a smug grin on my face, I thought, well, I’m sure his attempt will be cute. Fast forward a month, and it was more than cute.
His thruster achieved velocities far greater than mine did, and it was much more compact. Almost six! Almost six meters per second! I was proud of my friend. However, it called into question who I ultimately was.
I mean, what was I? Was I Plasma Channel or Plasma Enough Channel? Eventually, the defeat got to me. It was at this time I realized the universe needed the BSI Mark II. Let’s go.
The new thruster would feature several improvements. First, since I’ve learned to 3D print, many of the structures and supports could be designed lighter and more compact. Additionally, the round electrodes on my first thruster introduced turbulence, and the brass added lots of weight.
So, all the electrodes need to be designed with an aerodynamic shape in mind and reduced weight. Maybe I’d experiment with different configurations for the electrodes and see how that affects output. And the last major improvement was a little bit of an engineering task, but you know what? I was up for the challenge.
The open frame of the last thruster was great for testing, terrible for efficient airflow. So I wanted housing which provides auxiliary airflow from the sides while containing and focusing the air already moving within the thruster. I had my work cut out for me.
I figured the best place to start would be to optimize a single section of the thruster first, right, and then move on from there. So I started with some 3D design and acrylic work. All right, here’s the assembled first stage of the thruster, and I want to optimize this design before moving on to other stages.
But there’s a couple of key features. First of all, the inlet utilizes a semi-Venturi shape which should help a lot with airflow and drastically reduce eddy currents. And second, there is an adjustable inlet for air between the positive and the negative electrodes.
Now this allows air to be sucked in from the sides during operation because of the low pressure inside the main body. For all the tests, I’m using this power source. It pulses 15 volts into a flyback transformer which feeds a voltage multiplier about 8,000 volts producing 50,000.
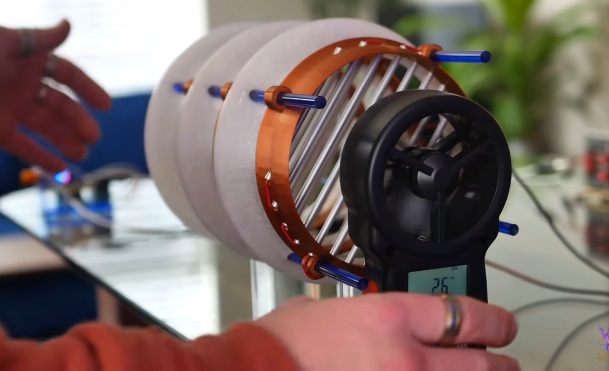
Let’s test it. I started the tests with a 25 millimeter electrode spacing. I’ve got everything wired up and I busted out the same wind meter I used last time.
Let’s just plug this in and see. Whoa! 1.4? 1.5? Next, I close the distance down to 16 millimeter spacing. All right, let’s give this another try.
Oh man! 2.2 meters a second. Oh that’s unreal! 2.3? 2.4? Oh that’s unreal! I ended up running the test two more times because I just, I really couldn’t believe those numbers. And in reality, the average speed for a single stage of the thruster was close to 2.1 meters a second which still totally blew me out of the water.
Now even though I was pleased with the results, I suspected it could improve if the 3D design board and removed about nine millimeters of length from the venturi shroud. After eight hours of printing and several cups of coffee later, the new shroud was brought into reality. A quick rewiring of the positive electrode and reassembling of the first stage, and it was good to go.
I am curious what effect this is going to have. One way to find out. Oh wow! 2.2? 2.3? Ah, that modification, man, that made a huge difference.
This is going to be an epic thruster. Like before, I ran a triplicate test and found that speeds averaged 2.3 meters a second. That was a 10% increase.
At this point, I really wanted to visualize the airflow better. You know, what did it look like? So I used a couple of methods that worked for me on the first thruster. All right, so I want to know how does a candle stand up to this? Not even a chance.
But to really see the airflow, I headed to a seafood department and grabbed some dry ice. It’s a wonderful source of fog, especially when placed in hot water. The black acrylic is just for better visibility.
Flipping the switch, it was clear the venturi inlet was doing its job. Beautiful. A really common suggestion I received for improving the first BSI thruster was to take the electrodes and place them perpendicular to each other.
Curious to see what would happen, I gave that a try. Is this a good change? Let’s find out, shall we? Oh, it’s about the same. Actually, that’s a little bit worse.
That’s kind of surprising. The average speed this produced was two meters a second, which honestly was kind of surprising because I assumed the cross-grid structure would lead to more predictable and organized spots where the ionic wind’s being produced, right? Everywhere the wire is crossing. That wasn’t the case.
This told me that parallel is king. So far, all tests used a positive wire spaced between the grounds. Printing off another version, I was curious what effect placing the wire directly in front of them had, so I ran another test.
Uh, it’s about the same as before. 1.9, two meters a second. Yeah, it’s pretty steady at about two a second.
It sounds terrifying though. Further tests showed that having electrodes perfectly lined up led to an average speed, again, of only two meters a second. So this told me that having the offset electrodes was actually the most efficient configuration.
Consider this. The old thruster put out 2.3 meters per second and it had three stages. This is just a single stage of the new thruster and it already puts out 90% of the velocity of the first version.
That’s a really good sign. And considering it weighs just over 120 grams, it’s proportionately lighter as well. At this point, I had successfully created the world’s crappiest and least OSHA compliant hairdryer.
If I achieved upwards of 2.3 meters per second with just a single stage, I sure as hell was curious what velocity three stages would bring. After a couple days of 3D printing, I was able to assemble the three stages together and address that question. Fully assembled, what a beaut.
You’ve got three identical sections with identical spacing between the sections and spacing between positive and negative electrode. You have an inlet for air right here and two auxiliary inlets on the side. I think this design is going to perform super well and only one way to find out.
This is going to be sick. Oh yeah, 2.9. 2.0. Can we get three? Three! Three meters a second. That’s so cool.
While that was an improvement, I essentially tripled the weight of a single stage while only adding 30% more velocity. Hardly a win. So I called up my friend Alex who works at a rocket company in Los Angeles.
We bounced ideas back and forth on what tests we could perform to discover limitations of my design. Have you been playing with grid spacing? Eventually we settled on one test that would be very telling. Here’s the setup I’ve got.
Two separate sources of airflow, a separately powered PC fan in the front, followed by a single stage of the thruster. Now the fan puts out about two meters per second and the thruster also around two meters a second. So what I want to know is when they combine, is it linear? Will it create four meters a second downstream? So the thruster’s on at about 2.1 meters a second.
Now to give it a boost from the fan. 0.2 meters a second boost? That makes no sense. That test was pretty useful because it revealed a design flaw, which is that any air coming in at 2 meters a second or faster doesn’t quite have enough time to interact with the next set of electrodes and be influenced to go faster.
So essentially the second and third stages don’t really help very much. To remedy this I started by digging into NASA’s designs for ionic thrusters. I also hit up my subscribers to see if any of them had experience with this.
I received a lot of great offers and Charlie’s response stood out to me. So I hopped on a video call with him where he suggested using thinner wire and elongated grounds, which made physical sense. This meant yet another reprinting and further waiting.
And by waiting I mean 15 hours. While that printed I had plenty of time to reflect on this video’s sponsor. So this entire project was originally inspired by when I read that MIT had created an ionic thrust airplane.
And it was super cool, it was in the news, honestly it was all over the news. And that’s why sponsors like Morning Brew are so important. Traditional news sources can be dry, dense, and addressing the elephant in the room a bit depressing.
Morning Brew on the other hand is tailored to your needs, witty, and super informative. It’s a daily newsletter delivered Monday through Sunday, which gets you up to speed on things like business, tech, and finance in under five minutes. It only takes an email to sign up and it’s free.
Instead of aimlessly searching for news in the morning, I’ve been using Morning Brew. And I learned that one, a giant Jurassic era insect was found on the outside of an Arkansas Walmart. And two, yet another corridor was found inside the Great Pyramid of Egypt.
And here’s the deal, I went inside of it last summer and I walked a whole five feet from it. Oh, if I just had a sledgehammer. Considering it’s free it really makes no sense not to sign up.
You can go to morningbrewdaily.com slash plasma channel or click the link in the description down below. All right, on to some thrust. Originally the positive electrode had 32 gauge wire, easy to see.
I changed that to 36 gauge, which is much thinner. And while the old ground used typical round tubing, the new ground electrode steps it up a notch with aerodynamic tubing. I also shortened the spacing between the stages by about 10 millimeters, which brought the thruster’s new length to just over seven and a half inches, or 19 centimeters.
Total weight now equaled 450 grams, which is 10% lighter than the first BSI thruster, or a full can of my favorite drinkable nitroglycerin. For testing, this thruster needed a proper stand, which meant one thing. Nothing quite pops like nuclear green acrylic.
Let’s test these changes. So the lowest power level, about 30 watts, brings us 1.6, 1.7 meters a second. 50 watts brings us 2.4, 2.6. Okay.
And this is full power at about 90 watts. 4? 3.8? Dude, that’s a huge improvement! Four meters per second obviously excited me, so I wanted to see the airflow on the final thruster. And the results blew me away.
Oh, that’s just biblical. You can see the inlet doing its job with smooth airflow over its edges and a tremendous amount of air movement. But what about the auxiliary inlets on the side? Were they pulling in additional air? You can see it right here, they are working beautifully.
Eagerly wanting to see the airflow on the output, I leaned on an old friend, the pyro inside of me. Oh my god, how’s that for airflow? The airflow on this is just insane. It has a 12 centimeter diameter and it’s pushing air at about four meters a second, right? Let’s compare this to the first BSI thruster and see how it measures up.
Mark 1 measured 38 centimeters, 495 grams, produced 2.3 meters per second, and was super fragile. Mark 2 measures 19 centimeters, is 10% lighter at 450 grams, produces four meters a second, and is structurally solid. I think it’s pretty clear this is a huge improvement.
For an explanation of the science behind the thruster, my first video details the physics behind ionic thrust. Ultimately, the work put into this thruster taught me a ton about airflow, and it brings me one step closer to an ionic thrust airplane of my own design. Ultimately, that is the goal of the thruster.
Good progress, but a lot of work to be done. Let me know your thoughts in the comments down below, and if you’d like to see an eventual version 3, you may want to consider subscribing. Thank you to Alex and Charles for your design suggestions, to Joel for pushing me, and to all of my Patreons who just constantly support my work.
But most importantly, thank you for watching. You stay classy.